If you want to install Windows 10 on Ubuntu using Virtual Machine Manager (virt-manager) and have Copy/Paste and shared folder access, follow this step-by-step guide.
📑 Table of Contents
- Step 1: Installing the Virtual Machine and Required Packages on Ubuntu (Host OS)
- Step 2: Creating a New Virtual Machine in Virtual Machine Manager
- Step 3: Enabling Shared Clipboard and Shared Folder Using Virtio-FS Technology
- 1. Enabling Shared Clipboard
- 2. Visual Steps to Enable Shared Folder with Virtio-FS
- First Stage: Adding Hardware in Virtual Machine Manager
- Second Stage: Adding Hardware and Mounting the Filesystem in the Guest OS (Windows 10)
- Third Stage (Optional): Adding the mount command for the shared space to the Windows Task Scheduler
Step 1: Installing the Virtual Machine and Required Packages on Ubuntu (Host OS)
To set up a Windows 10 environment on Ubuntu, we first need to create a virtual machine. Our host OS is Ubuntu 24.04.2 LTS, and we used Virtual Machine Manager software to manage the virtual machines. This open-source software provides a simple and powerful graphical interface for managing VMs based on KVM/QEMU, easily allowing configuration of hardware, disk, network, and display. Full support for snapshots and hardware resource management made it a suitable choice for installing and controlling virtual machines.
1. Installing the Virtual Machine
The required packages were installed by running the following commands in the terminal:
sudo apt update sudo apt install qemu-kvm libvirt-daemon-system libvirt-clients virt-managerAfter installation, by running virt-manager, you can create a new virtual machine and install the Windows 10 64-bit operating system.
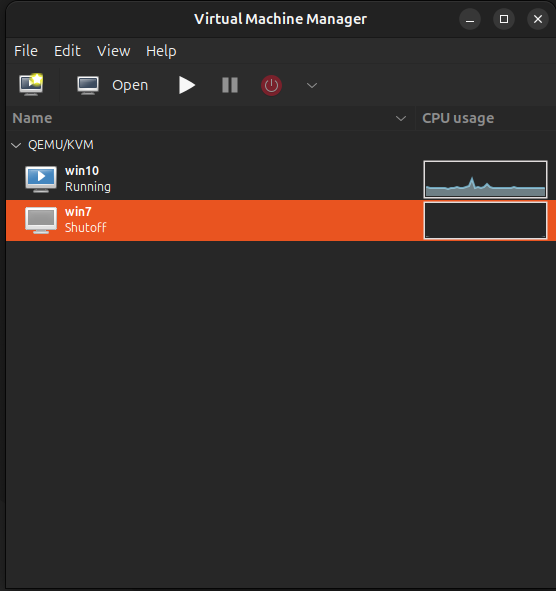
2. Installing the Virtio-FS Package on the Host
To share folders between Ubuntu and the Windows virtual machine, Virtio-FS technology was used. This package is designed based on KVM and offers significantly faster performance than traditional methods (like 9p), providing direct sharing of the host folder with the VM and user mapping. It is installed on the host with the following command:
sudo apt install virtiofsdStep 2: Creating a New Virtual Machine in Virtual Machine Manager
After installing Virtual Machine Manager, it’s time to create a new virtual machine. The following steps were taken to do this:
1. Running the Virtual Machine Manager program
- Run via terminal by executing the command
virt-manager - Select the program from the Ubuntu Dock —> Applications menu —> Search

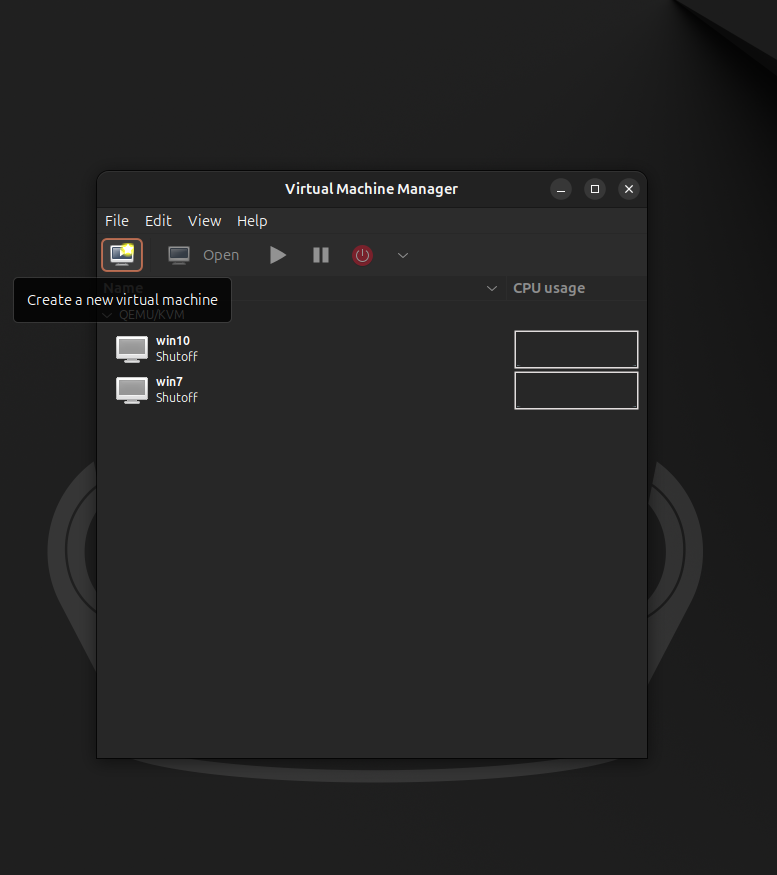
2. Visual Steps to Create a New Virtual Machine by clicking on Create a new virtual machine:
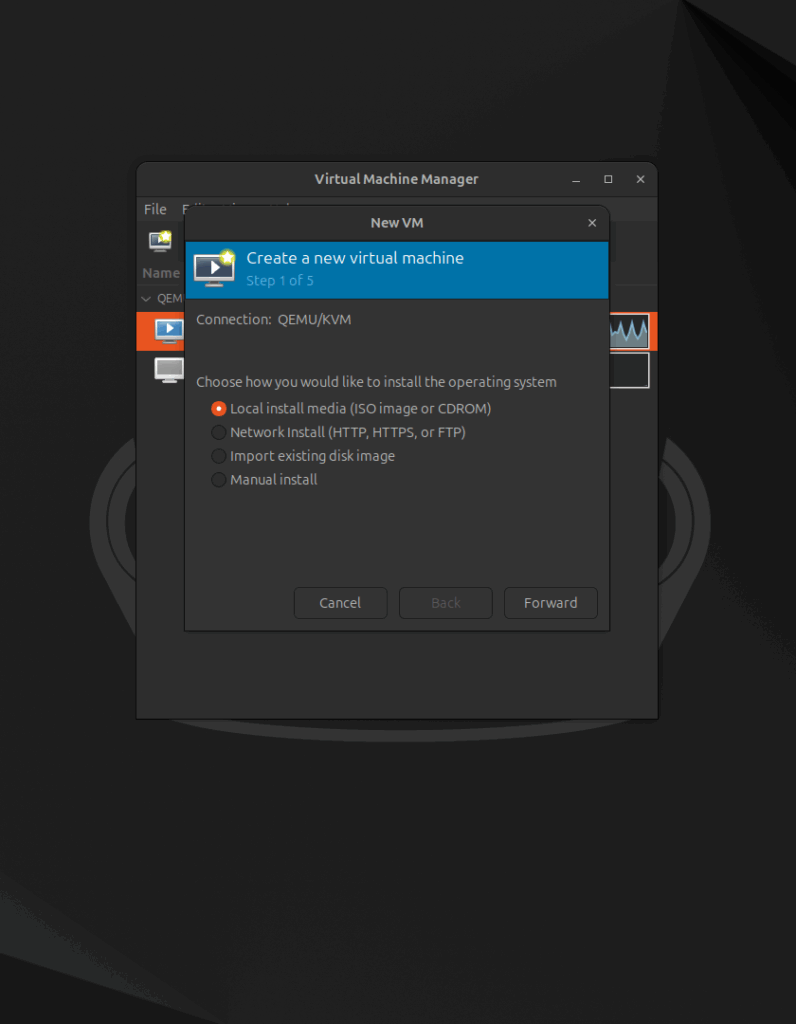
Step 1 of 5: Choosing the OS Installation Method
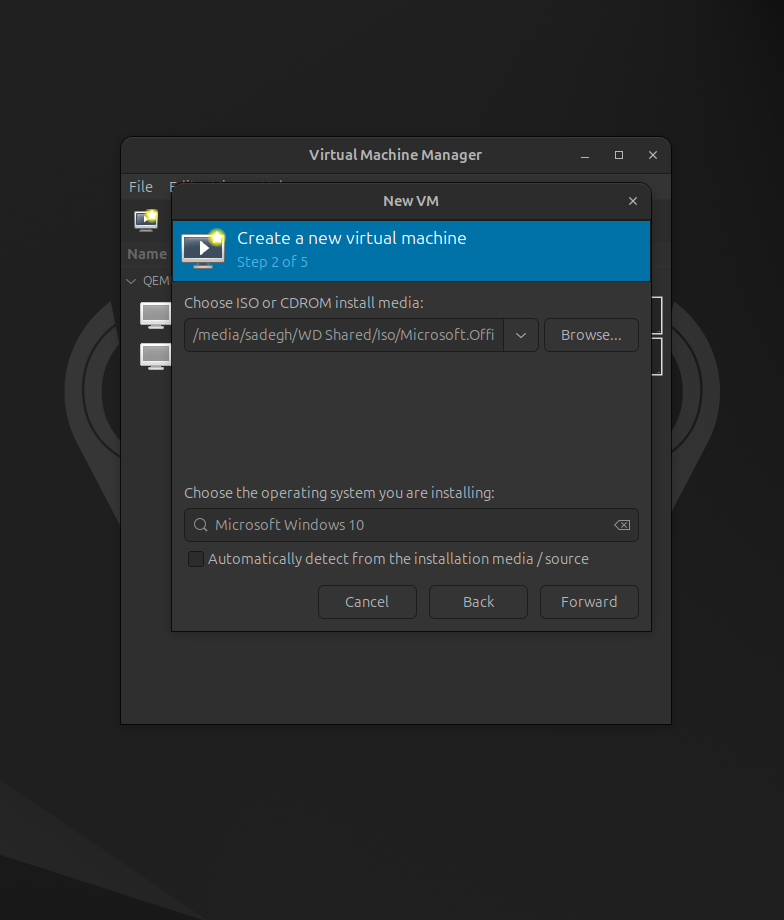
Step 2 of 5: Selecting the Windows 10 Installation ISO File
In step 2, select the Windows 10 installation ISO file (or your desired OS) by clicking Browse and then Browse Local. To proceed to the next step, if Virtual Machine Manager couldn’t identify the OS from the ISO file in the Choose the operating system you are installing field, disable the Automatically detect from the installation media / source option and select Microsoft Windows 10 in the Choose the operating system you are installing field.
Step 3 of 5: Allocating Memory (RAM) and Processor (CPU)
In the third step, you need to select the hardware resources for the Windows 10 virtual machine. When creating the virtual machine, Virtual Machine Manager by default allocates 2 processor cores and 4 gigabytes of RAM for Windows 10. These values are chosen based on the official minimum requirements of Windows 10 and are perfectly suitable for running the OS and applications like Microsoft Office smoothly. On the other hand, these settings do not put much strain on the host system and strike a balance between virtual machine performance and preserving host resources.
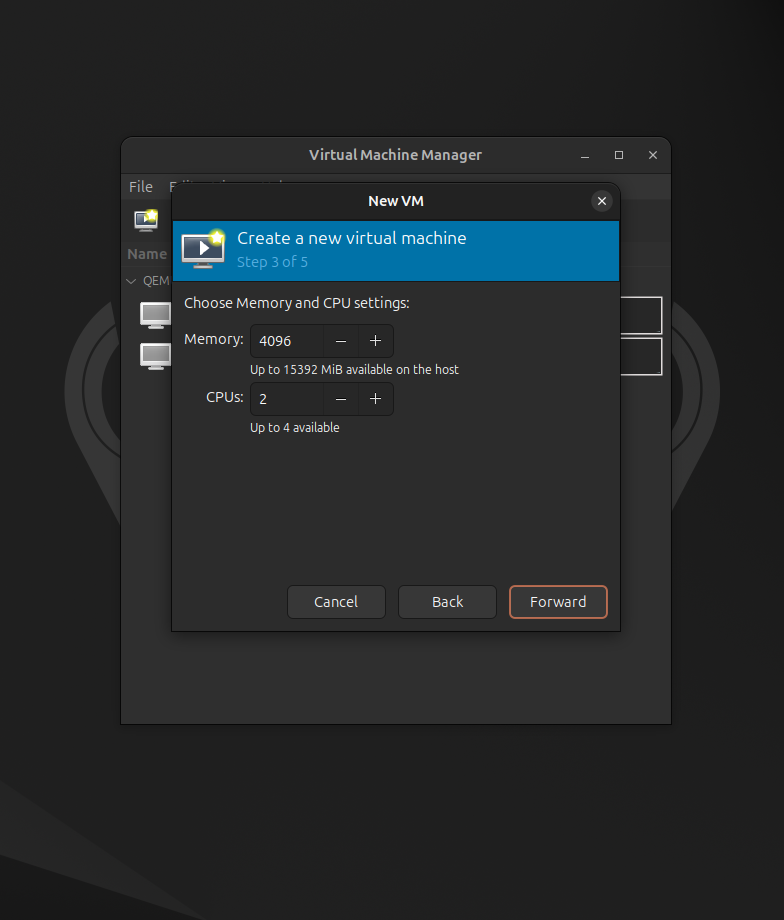
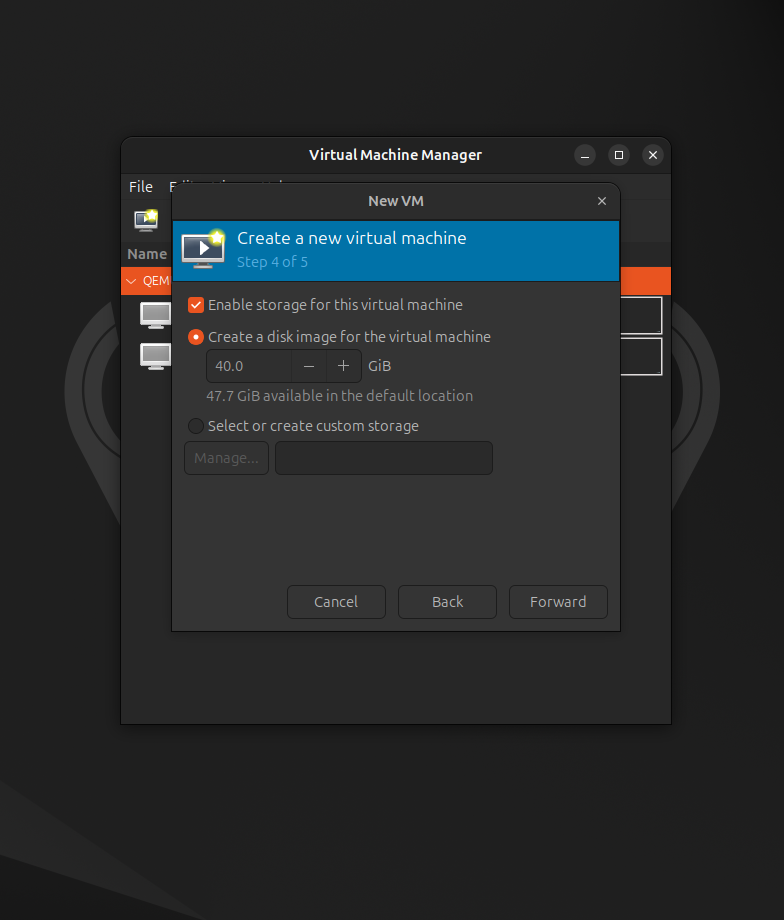
Step 4 of 5: Creating and Setting the Virtual Disk Size
In the virtual disk creation stage, a default size of 40 gigabytes is usually suggested for Windows 10. This provides enough space for installing the OS, receiving updates, and installing main software like Microsoft Office and VBA programming tools. At the same time, the disk size is not excessively large to avoid unnecessarily occupying the host’s storage space. Therefore, choosing 40 GB creates a logical balance between performance, software needs, and host space optimization.
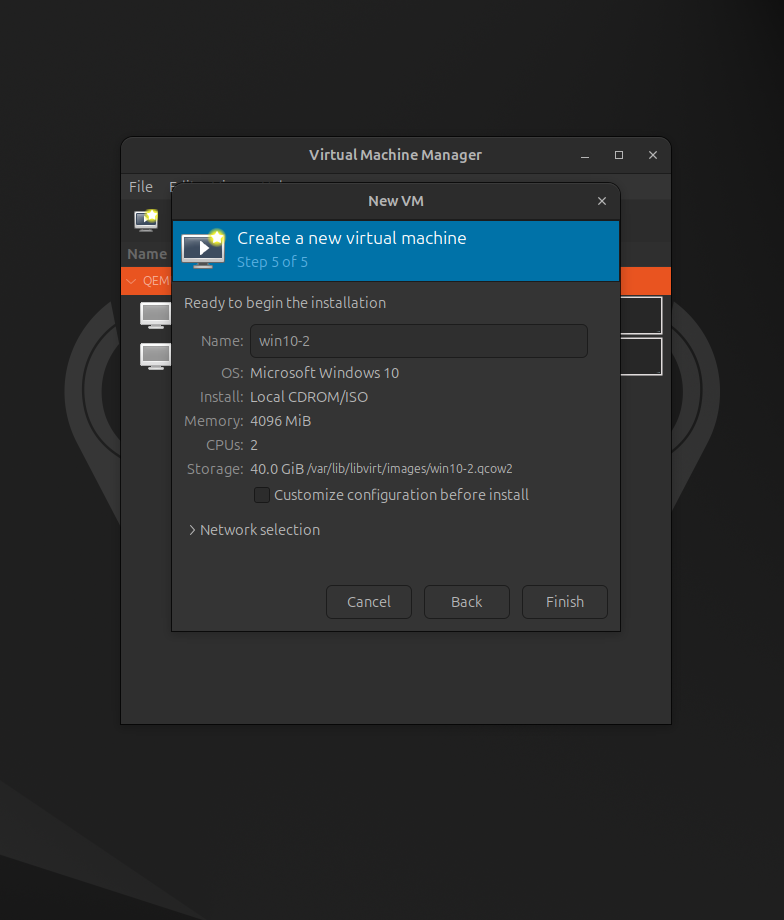
Step 5 of 5: Final Review of Settings and Starting the Installation
The fifth and final step involves reviewing the settings and choosing a name for the virtual machine. You can change the name here or stick with the default name. After clicking the Finish button, the virtual machine will be created and started.
3. Video Tutorial: How to Create a Windows 10 Virtual Machine Using Virtual Machine Manager on Ubuntu:
Step 3: Enabling Shared Clipboard and Shared Folder Using Virtio-FS Technology
1. Enabling Shared Clipboard
Virtual Machine Manager provides the ability to enable Copy and Paste (Clipboard Sharing) between the host system and the virtual machine. By enabling this option, you can easily transfer text and data between Ubuntu and Windows without needing manual methods like file transfer. This feature is especially useful when programming or testing code.
Steps to Enable Shared Clipboard in Virtual Machine Manager
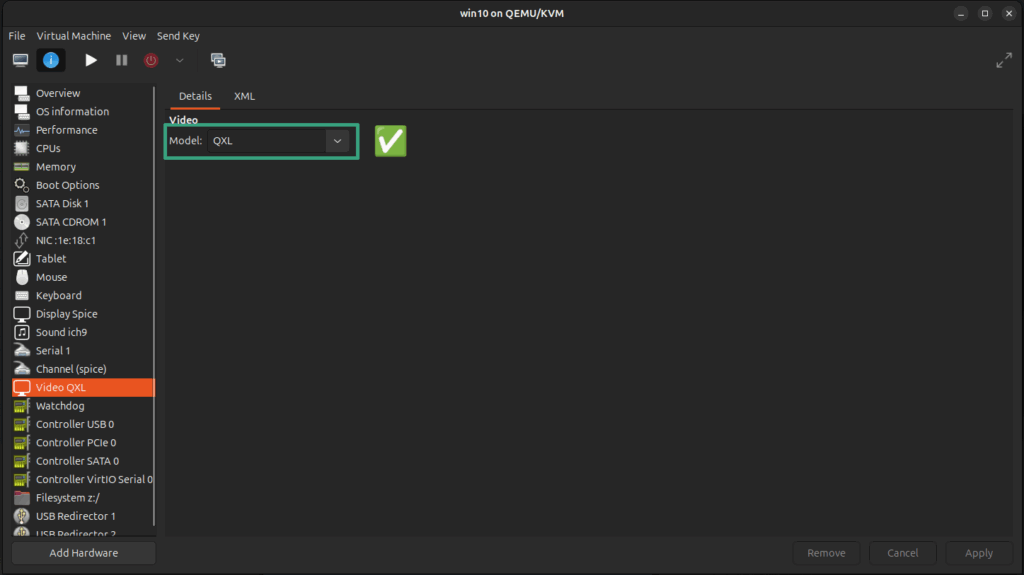
After installing Windows on the virtual machine, select the virtual machine icon on the main Virtual Machine Manager screen and click Open. In the opened window, click Show virtual hardware details. Check the following settings and change them to the specified values if necessary.
- In the Video tab, ensure the Model option is set to QXL.
- In the Display tab (often labeled Spice Server in the model dropdown if using QXL), ensure the Type is set to Spice Server.
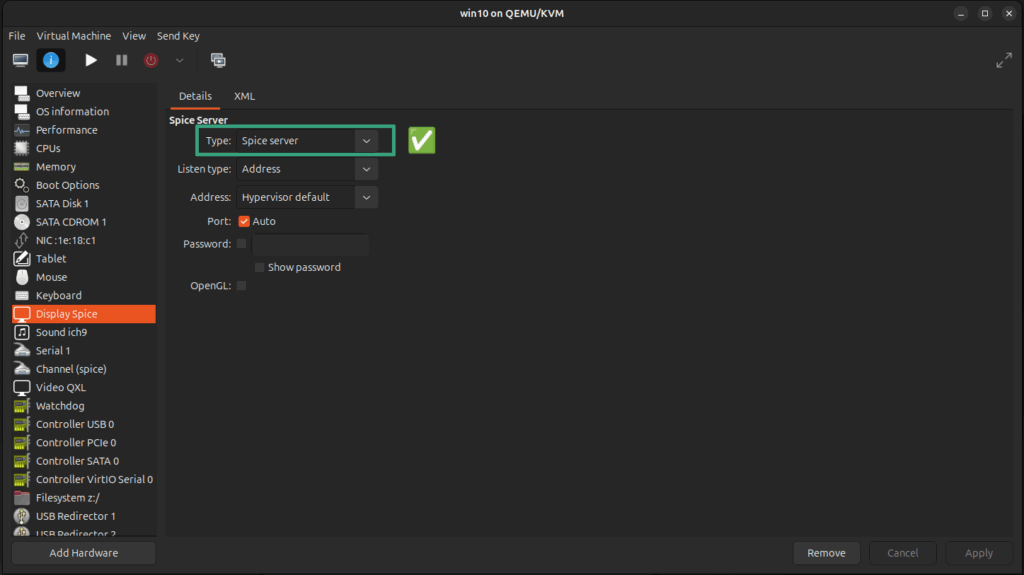
Click the Power on the virtual machine button to start the VM. Perform the following steps in the guest Windows OS to enable the shared clipboard between host and guest.
- Download and install the spice-guest-tools file. This software package contains drivers and services that establish communication between the host system (Ubuntu) and the guest (Windows).
- After installation, the spice-vdagent service will be activated, allowing:
- Copy/Paste text between Windows and Ubuntu
- Drag & Drop files between host and guest
- Automatic VM window resolution change to be enabled.
2. Visual Steps to Enable Shared Folder with Virtio-FS
To enable folder sharing using virtiofs, you must first add the Filesystem hardware to your virtual machine.
First Stage: Adding Hardware in Virtual Machine Manager
To enable folder sharing using virtiofs, you must first connect the Filesystem hardware to your virtual machine. To do this, first shut down the virtual machine. On the main Virtual Machine Manager screen, select the virtual machine icon and click Open. In the opened window, click Show virtual hardware details. Click the Add Hardware button as shown in the image below.
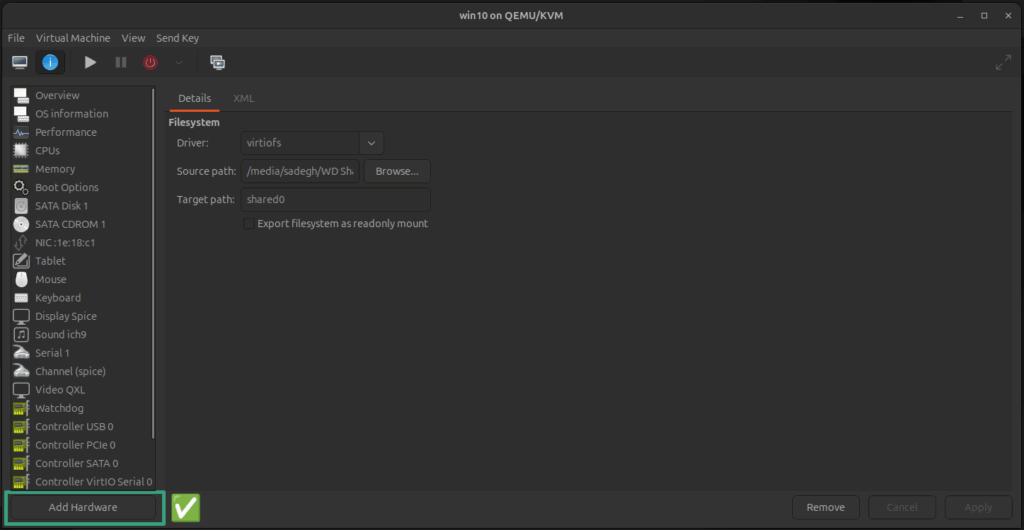
In the opened window, select the Filesystem tab. For Driver, choose the virtiofs option. Click the Browse… button and select the folder or drive you want to be the shared space. In the Target path section, enter the name you want to be displayed for the drive in Windows. In this tutorial, we chose the name shared0 for this path.
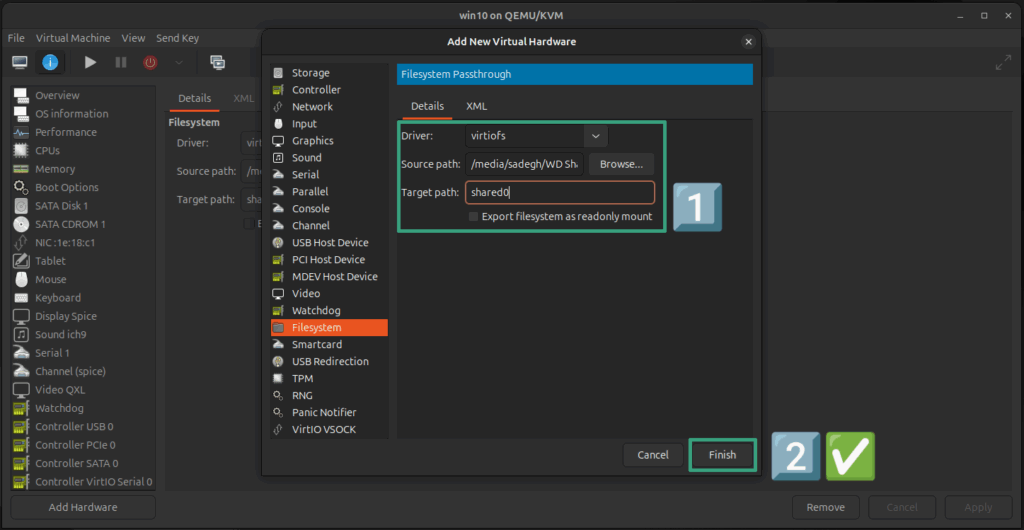
Second Stage: Adding Hardware and Mounting the Filesystem in the Guest OS (Windows 10)
1. Installing the virtiofs driver in Windows 10
In Windows 10, download and install the latest virtiofs driver from this link. The driver will be installed in the path C:\Program Files\Virtio-Win\VioFS\virtiofs.exe.
2. Installing WinFsp
Download and install the latest version of WinFsp from https://github.com/winfsp/winfsp/releases. The current latest version is version 2.1, and you can download the installer file from this link. WinFsp will be installed in the path C:\Program Files (x86)\WinFsp\bin.
3. Adding the virtiofs and WinFsp installation paths to the Path system environment variable in Windows 10
In Windows 10, right-click on This PC and click Properties. In the window that opens, click on Advanced system settings from the right side. From the Advanced tab of the System Properties window, click on Environment Variables…. In the System variables section, find and select the Path variable, then click the Edit… button. Add the paths C:\Program Files\Virtio-Win\VioFS and C:\Program Files (x86)\WinFsp\bin to the end of the list and save.
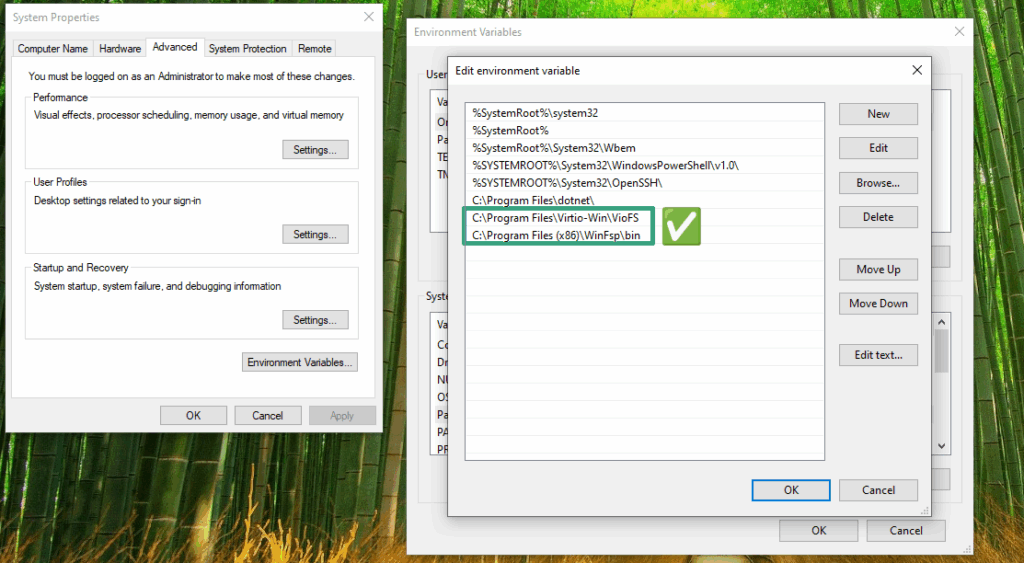
Video Tutorial: Adding virtiofs and WinFsp installation paths to the Path system environment variable in Windows 10
3. Mounting the filesystem in the guest OS
To mount the filesystem in the guest OS, open the Start menu and search for cmd. Right-click on Command Prompt and select Run as administrator. Type the following command in the Command Prompt window and press Enter.
virtiofs.exe -t shared0 -m Z:If the command execution encounters the error The service VirtIO-FS failed to load WinFsp DLL (Status=c0000034)., type Services in the Start menu. In the Services window, find the VirtIO-FS Service and double-click on it. If the Service status is anything other than Running, click the Start button and select the Automatic option in the Startup type dropdown, then click OK. Also perform these steps for the WinFsp.Launcher service, then run the command again.
If the command executes successfully, you can see the Z: drive named shared0 in Windows Explorer. Note that after every Windows restart, you must run this command to mount the shared space in Windows. To fix this, perform the third step to automatically mount the shared space between the host and guest OS after each Windows startup.
Third Stage (Optional): Adding the mount command for the shared space to the Windows Task Scheduler
- Search for and open Task Scheduler in the Windows Start menu.
- Click on Create Task on the right side.
- In the Name field, choose a name for the task, for example, mount shared folder.
- In the Triggers tab, click the New… button and at the top of the opened window, set the Begin the task value to At log on or At startup and click OK.
- In the Actions tab, click the New… button and in the Program/script field, enter
"C:\Program Files\Virtio-Win\VioFS\virtiofs.exe"and in the Add arguments (optional) field, enter-t shared0 -m Z:, then click OK. - In the General tab, check the Run with highest privileges box and click OK.
Read More
⛓️💥 Fixing "Network Unreachable" Error in Ubuntu 18.04+ (Netplan Configuration Guide)