
If you are an advanced Excel user, you have likely encountered situations where you need to consolidate data from multiple Excel files. In this comprehensive and practical guide, you will learn how to access data from another Excel file using VBA. This tutorial will help you streamline your reporting processes and efficiently manage data stored across different files.
📑 Table of Contents
- Different Methods for Accessing Another File
- Accessing Another Excel File with VBA: A Complete Guide
- Fundamentals of Connecting to Another Excel File via VBA
- Programming Scenario: Generating an Automatic Report
- Code Review:
- 1) Sheet Change Event — Detecting changes in A2 or B2
- 2) Calling the report subroutine (main function)
- 3) Defining the report subroutine and disabling screen updates
- 4) Accessing ThisWorkbook and Creating a New Output File
- 5) Building Monthly File Paths (Source Paths)
- 6) Opening Source Files as ReadOnly
- 7) Copying the Report Template from the Main Sheet (Copy + PasteSpecial)
- 8) Writing the Course Title (Using the MonthName Function)
- 9) Finding the Last Row with Data in a Column (End(xlUp) Pattern)
- 10) Summing Values with WorksheetFunction.Sum
- 11) Inserting Absolute and Percentage Change Formulas with Formatting
- 12) Final Formatting and Appearance Alignment
- 13) Saving the Report and Closing Source Files
- 14) Releasing Resources and Final Message
- Improving the CreateComparisonReport Function with Error Handling and Resource Cleanup
- Code Review:
- Summary
Different Methods for Accessing Another File
There are several ways to access data from another Excel file, each offering its own advantages and limitations. The right approach depends on factors such as the volume of data, whether automatic updates are required, and your access level.
Basic Method: Direct Cell Linking
The easiest approach for beginners is to use Excel’s built-in cell linking feature. Follow the steps below:
- Copy the desired cell from the source file (the file containing the data) using Ctrl+C.
- Go to the target file (the file where you want the data to appear) and right-click on the destination cell.
- From the Paste Special options, choose Paste Link.
Excel will automatically create a link to the source cell. To manage these links, navigate to Data → Queries & Connections → Edit Links. This method works well for small datasets that do not require frequent or dynamic updates.
Advanced Method: Using VBA
For more complex scenarios—such as when you need to process data, automate tasks, or handle large datasets—VBA provides the best solution. While it requires some programming knowledge, it offers exceptional flexibility and control over how you access and manipulate data.
Accessing Another Excel File with VBA: A Complete Guide
Fundamentals of Connecting to Another Excel File via VBA
The most straightforward way to access another Excel file in VBA is by using the Workbook object. The following example demonstrates this process step by step.
Sub AccessExternalWorkbook()

    ' Declare variables for workbook and worksheet
    Dim excelApp As Excel.Application
    Dim externalWb As Workbook
    Dim externalWs As Worksheet


    ' Define the full path to the external Excel file
    Dim filePath As String
    filePath = "C:\Reports\Data.xlsx"

    ' Open the external workbook
    Set externalWb = Workbooks.Open(Filename:=filePath, ReadOnly:=True)

    ' Set reference to the desired worksheet
    Set externalWs = externalWb.Worksheets("Sheet1")

    ' Read data from a specific cell (e.g., A1)
    Dim cellValue As String
    cellValue = externalWs.Range("A1").Value

    ' Display the read value in a message box (for testing)
    MsgBox "The value in cell A1 is: " & cellValue

    ' Close the external workbook without saving changes
    externalWb.Close SaveChanges:=False

    ' Release object variables from memory
    Set externalWs = Nothing
    Set externalWb = Nothing

End Sub
Line-by-line explanation of the code:
Sub AccessExternalWorkbook()- Defines a procedure (Sub) named
AccessExternalWorkbook. The execution of this block of code begins here.
- Defines a procedure (Sub) named
Dim excelApp As Excel.Application- Declares a variable named
excelAppto hold a reference to an Excel Application object—an instance of the Excel program. UsingExcel.Applicationrequires a reference to the Excel Object Library, or the code must be running inside Excel itself.
- Declares a variable named
Dim externalWb As Workbook- Declares a variable to store a reference to a Workbook object (the opened Excel file).
Dim externalWs As Worksheet- Declares a variable to store a reference to a Worksheet object within the opened workbook.
' Define the full path to the external Excel file- A comment describing that the next section defines the file path.
Dim filePath As String- Declares a string variable to store the full path of the external Excel file.
filePath = ThisWorkbook.Path & "\Ext-data.xlsx"- Assigns the file path.
ThisWorkbook.Pathreturns the directory path of the workbook containing this macro (usually without a trailing backslash). The expression& "\Ext-data.xlsx"appends the file name. Notes:- If the current workbook is not saved,
ThisWorkbook.Pathreturns an empty string, leading to an invalid path. - If the file
Ext-data.xlsxdoesn’t exist, attempting to open it will result in a runtime error.
- If the current workbook is not saved,
- Assigns the file path.
' Open the external workbook- A comment explaining that the following command opens the external file.
Set excelApp = New Excel.Application- Creates a new instance of Excel and assigns it to
excelApp. This launches a new Excel process (not necessarily the one currently running). Alternatives includeCreateObject("Excel.Application")for late binding orSet excelApp = Applicationto use the existing Excel instance.
- Creates a new instance of Excel and assigns it to
Set externalWb = excelApp.Workbooks.Open(Filename:=filePath, ReadOnly:=True)- Uses the
excelAppobject to open the workbook located atfilePath, assigning it toexternalWb. The parameterReadOnly:=Trueensures the file is opened in read-only mode, preventing save prompts or write locks. If the path is invalid, a runtime error occurs.
- Uses the
excelApp.Visible = False- Determines whether the Excel window is visible. Setting it to
Falseruns Excel in the background (hidden). This is useful for automation tasks; for debugging, you may set it toTrue.
- Determines whether the Excel window is visible. Setting it to
' Set reference to the desired worksheet- A comment explaining that the next line selects the target worksheet.
Set externalWs = externalWb.Worksheets("Sheet1")- Selects the worksheet named
"Sheet1"fromexternalWband assigns it toexternalWs. Notes:- If the sheet does not exist, a runtime error will occur.
- You can also refer to a sheet by index (e.g.,
Worksheets(1)) or useSheets("Sheet1")to include chart sheets as well.
- Selects the worksheet named
' Read data from a specific cell (e.g., A1)- A comment describing that the next line reads data from a specific cell.
Dim cellValue As String- Declares a
Stringvariable to store the cell’s value. Note that.Valuereturns aVariant; assigning it to aStringforces type conversion. If the cell contains an error (e.g.,#N/A), it’s recommended to check before assignment.
- Declares a
cellValue = externalWs.Range("A1").Value- Reads the value of cell A1 and stores it in
cellValue. Notes:- If A1 is empty, it usually returns an empty string
"". - To avoid unwanted data type conversions (especially with dates),
Value2can be used instead ofValue. - If there’s a risk of cell errors, use
If Not IsError(externalWs.Range("A1").Value) Then ...before reading the value.
- If A1 is empty, it usually returns an empty string
- Reads the value of cell A1 and stores it in
' Display the read value in a message box (for testing)- A comment describing that the next line displays the read value for testing purposes.
MsgBox "The value in cell A1 is: " & cellValue- Displays a message box showing the retrieved value to the user.
' Close the external workbook without saving changes- A comment indicating that the external workbook will be closed without saving changes.
externalWb.Close SaveChanges:=False- Closes the opened workbook. The parameter
SaveChanges:=Falseensures it closes silently without saving or prompting the user.
- Closes the opened workbook. The parameter
excelApp.Quit- Terminates the Excel instance created by
New. The Excel process will close as long as no remaining references exist.
- Terminates the Excel instance created by
' Release object variables from memory- A comment explaining that object references will be released from memory.
Set externalWs = Nothing- Clears the worksheet reference to free up memory.
Set externalWb = Nothing- Clears the workbook reference.
Set excelApp = Nothing- Releases the Excel application reference. Even after calling
Quit, the process may remain in memory if references are left undeleted; setting them toNothingensures proper cleanup.
- Releases the Excel application reference. Even after calling
End Sub- Marks the end of the Sub procedure.
Programming Scenario: Generating an Automatic Report
Suppose you have a main file named Main.xlsm. Monthly reports are stored in a folder called sale-reports located in the same directory as the main file. The files are named based on the month number (for example, 1.xlsx, 2.xlsx).
In the main file, there is a table in the range A1:B2:
| Previous Sales Month | Latest Sales Month |
| 1 | 2 |
The user selects the values of cells A2 and B2 through a DropDown list (data validation). To create this list:
- Select cells A2 and B2.
- Go to the Data tab.
- Click on Data Validation.
- In the opened dialog box, under Allow, choose List.
- In the Source field, enter the range containing the month numbers (for example, Z1:Z12).
- Click OK.
Now, from the Excel Developer tab, click on Visual Basic. In the VBE Project Explorer window, double-click on the ThisWorkbook object to open its Code Window. Then copy the following VBA code into it.
Private Sub Workbook_SheetChange(ByVal Sh As Object, ByVal Target As Range)

    ' Check if the change happened in the specific range A2 or B2 on any sheet
    If Not Intersect(Target, Sh.Range("A2:B2")) Is Nothing Then

        ' Get the selected month names
        Dim previousMonth As String
        Dim currentMonth As String
        previousMonth = Sh.Range("A2").Value
        currentMonth = Sh.Range("B2").Value

        ' Proceed only if both cells are filled
        If previousMonth <> "" And currentMonth <> "" Then
            Call CreateComparisonReport(CByte(previousMonth), CByte(currentMonth))
        End If
    End If

End Sub

Sub CreateComparisonReport(ByVal prevMonth As Byte, ByVal currMonth As Byte)

    ' Declare all variables
    Dim mainWb As Workbook
    Dim mainWs As Worksheet
    Dim reportWb As Workbook
    Dim prevWs As Worksheet
    Dim currWs As Worksheet
    Dim outputWs As Worksheet
    Dim mainPath As String
    Dim reportPath As String
    Dim prevLastRow As Long
    Dim currLastRow As Long

    ' Turn off screen updating and alerts for performance
    Application.ScreenUpdating = False
    Application.DisplayAlerts = False

    ' Set the main workbook and get its path
    Set mainWb = ThisWorkbook
    Set mainWs = mainWb.Worksheets(1)
    mainPath = mainWb.Path

    ' Create a new workbook for the output report
    Set reportWb = Workbooks.Add
    Set outputWs = reportWb.Worksheets(1)
    outputWs.Name = "Comparison Report"

    ' Build the file paths for the source monthly reports
    Dim prevFilePath As String
    Dim currFilePath As String
    prevFilePath = mainPath & "\sale-reports\" & prevMonth & ".xlsx"
    currFilePath = mainPath & "\sale-reports\" & currMonth & ".xlsx"

    ' Open the previous month's report file
    Set prevWs = Workbooks.Open(prevFilePath, ReadOnly:=True).Worksheets(1)
    ' Open the current month's report file
    Set currWs = Workbooks.Open(currFilePath, ReadOnly:=True).Worksheets(1)

    ' --- Populate the new report with data and structure ---

    ' Copy the report template to the report file
    mainWs.Range("A3:E5").Copy
    outputWs.Range("A1:E2").PasteSpecial xlPasteAll

    ' Add period labels
    outputWs.Range("A3").Value = "Sales of " & MonthName(currMonth) & " compared to " & MonthName(prevMonth)

    ' Copy sales data from source files (assuming payment data is in column C)
    prevLastRow = prevWs.Cells(prevWs.Rows.Count, "C").End(xlUp).Row
    currLastRow = currWs.Cells(currWs.Rows.Count, "C").End(xlUp).Row

    outputWs.Range("B3").Value = Application.WorksheetFunction.Sum(prevWs.Range("C2:C" & prevLastRow)) ' Previous period sales
    outputWs.Range("C3").Value = Application.WorksheetFunction.Sum(currWs.Range("C2:C" & currLastRow)) ' Current period sales

    ' Calculate the absolute change in sales
    outputWs.Range("D3").Formula = "=C3-B3"

    ' Set number format
    outputWs.Range("B3:D3").NumberFormat = "#,##0_);[Red](#,##0)"

    ' Calculate the percentage change
    outputWs.Range("E3").Formula = "=IF(C3<>0, D3/C3, 0)"

    ' Format the percentage cell as percentage
    outputWs.Range("E3").NumberFormat = "0.00%"

    ' Auto-fit columns for better readability
    outputWs.Columns("A:E").AutoFit

    ' Center align text in A3:E3 range
    outputWs.Range("A3:E3").HorizontalAlignment = xlCenter
    outputWs.Range("A3:E3").VerticalAlignment = xlCenter

    ' Define the path for the new report file and save it
    reportPath = mainPath & "\pop-report.xlsx"
    reportWb.SaveAs Filename:=reportPath, FileFormat:=xlOpenXMLWorkbook
    reportWb.Close SaveChanges:=True

    ' Close the source workbooks without saving
    prevWs.Parent.Close SaveChanges:=False
    currWs.Parent.Close SaveChanges:=False

    ' Turn screen updating back on
    Application.ScreenUpdating = True
    Application.DisplayAlerts = True

    ' Release object variables
    Set prevWs = Nothing
    Set currWs = Nothing
    Set outputWs = Nothing
    Set reportWb = Nothing
    Set mainWb = Nothing

    ' Inform the user
    MsgBox "The new report has been successfully created at: " & vbNewLine & reportPath, vbInformation, "Process Completed"

End Sub
Code Review:
1) Sheet Change Event — Detecting changes in A2 or B2
Private Sub Workbook_SheetChange(ByVal Sh As Object, ByVal Target As Range)

    ' Check if the change happened in the specific range A2 or B2 on any sheet
    If Not Intersect(Target, Sh.Range("A2:B2")) Is Nothing Then
        ...
    End If

End SubWorkbook_SheetChangeis a Workbook-level event stored in theThisWorkbookmodule. It runs every time a cell is changed on any sheet within the workbook.- The
Shparameter refers to the sheet where the change occurred, andTargetrepresents the cell(s) that were modified. Intersect(Target, Sh.Range("A2:B2"))checks whether the change intersects the A2:B2 range. If the result ofIntersectis notNothing, it means A2 or B2 was changed.
In VBA, the
Workbook_SheetChangeevent is used to respond to user edits on any sheet. With theIntersectfunction, we can restrict the trigger to a specific range (e.g., A2 or B2). This is an efficient and precise method, perfect for scenarios like selecting a month to generate a comparison report in Excel.
Important note:
- Whenever a macro itself might modify the sheet, always place
Application.EnableEvents = Falsebefore making changes, and set it back toTrueafterward. This prevents recursive event triggers.
2) Calling the report subroutine (main function)
If previousMonth <> "" And currentMonth <> "" Then
    Call CreateComparisonReport(CByte(previousMonth), CByte(currentMonth))
End If- If both cells are filled, the macro calls
CreateComparisonReportwith two arguments — the previous month and the current month. - Pay attention to parameter types: the
CreateComparisonReportroutine expects parameters of typeByte. Therefore, it’s best to define variables as numeric from the start. TheCBytefunction converts a value to the Byte data type.
After validating inputs, you can trigger the report generation process by calling
CreateComparisonReport(prev, curr). This pattern is clean and modular, improving readability and maintainability of VBA code.
3) Defining the report subroutine and disabling screen updates
Sub CreateComparisonReport(ByVal prevMonth As Byte, ByVal currMonth As Byte)
    ' Turn off screen updating and alerts for performance
    Application.ScreenUpdating = False
    Application.DisplayAlerts = False
    ...
    ' Turn screen updating back on
    Application.ScreenUpdating = True
    Application.DisplayAlerts = True
End Sub
Application.ScreenUpdating = Falseprevents Excel from redrawing the screen repeatedly, which speeds up macro execution.Application.DisplayAlerts = Falsesuppresses dialog boxes (for example, overwrite warnings). Warning: Always remember to turn these settings back on, or Excel will remain in this silent mode.
To improve VBA macro performance, it’s common to use
Application.ScreenUpdating = FalseandApplication.DisplayAlerts = False. This minimizes flicker, speeds up execution, and prevents unwanted pop-ups when saving or closing files. However, always restore them toTruein your cleanup orFinallyblock to maintain proper Excel behavior.
Practical tip: Always use the On Error GoTo Cleanup pattern so that even if an error occurs, your cleanup section can run and restore Excel’s settings properly.
4) Accessing ThisWorkbook and Creating a New Output File
Set mainWb = ThisWorkbook
Set mainWs = mainWb.Worksheets(1)
mainPath = mainWb.Path

' Create a new workbook for the output report
Set reportWb = Workbooks.Add
Set outputWs = reportWb.Worksheets(1)
outputWs.Name = "Comparison Report"ThisWorkbookrefers to the workbook that contains the macro code (unlikeActiveWorkbook).Workbooks.Addcreates a new workbook, which is used to store the output report.
In this scenario, we use
ThisWorkbookto get the path of the main file, andWorkbooks.Addto create a new workbook for the report.
Practical tip: Check the value of mainPath before saving (if the file hasn’t been saved yet, ThisWorkbook.Path will be empty).
5) Building Monthly File Paths (Source Paths)
prevFilePath = mainPath & "\sale-reports\" & prevMonth & ".xlsx"
currFilePath = mainPath & "\sale-reports\" & currMonth & ".xlsx"- The path here is built relative to the folder where
ThisWorkbookis located, assuming that thesale-reportsfolder exists and the files are saved with the name “month-number.xlsx”. - If the folder or file does not exist,
Workbooks.Openwill raise an error.
To access monthly files, combine
ThisWorkbook.Pathwith the folder namesale-reports; then the files will be opened as1.xlsx,2.xlsx, and so on. It’s recommended to check for the file’s existence withDir()before opening it to prevent errors.
Sample code to check if a file exists:
If Dir(prevFilePath) = "" Then
    MsgBox "Previous month file not found: " & prevFilePath
    Exit Sub
End If
6) Opening Source Files as ReadOnly
Set prevWs = Workbooks.Open(prevFilePath, ReadOnly:=True).Worksheets(1)
Set currWs = Workbooks.Open(currFilePath, ReadOnly:=True).Worksheets(1)
Workbooks.Open(..., ReadOnly:=True)opens the file in read-only mode to prevent locking or accidental changes.- Note: This one-liner (
... .Worksheets(1)) directly returns the worksheet, but if you also need to reference the workbook, it’s better to store it in a separate variable first.
To read data from monthly files, use
Workbooks.OpenwithReadOnly:=Trueso they open safely without modification. If you need to close or delete the file later, you should keep a reference to the Workbook object.
Suggestion: it’s better to use a two-step approach like this:
Dim prevWb As Workbook
Set prevWb = Workbooks.Open(prevFilePath, ReadOnly:=True)
Set prevWs = prevWb.Worksheets(1)
This allows you to explicitly call prevWb.Close later.
7) Copying the Report Template from the Main Sheet (Copy + PasteSpecial)
' Copy the report template to the report file
mainWs.Range("A3:E5").Copy
outputWs.Range("A1:E2").PasteSpecial xlPasteAll- To transfer a range containing formats, formulas, and visual content from one workbook to another,
Range.Copyfollowed byPasteSpecialis used. xlPasteAllpastes all data including contents, formats, hidden elements, validation, and more.
To transfer the report layout from the main file to the output file in VBA, use
Range.CopyandPasteSpecial. The optionPasteSpecial xlPasteAlltransfers all aspects of the cells (values, formats, formulas, and validation). If you only need the values, usexlPasteValuesor assign values directly (.Value = .Value) for better speed and stability.
8) Writing the Course Title (Using the MonthName Function)
outputWs.Range("A3").Value = "Month " & MonthName(currMonth) & " compared to " & MonthName(prevMonth)- The value of cell A3 in the output sheet is filled with a Month number that uses the MonthName function to convert the month number into its English name.
To generate the report title, we use an internal mapping function named MonthName that returns the English month name based on its number, and by concatenating the strings, we create a readable title.
9) Finding the Last Row with Data in a Column (End(xlUp) Pattern)
prevLastRow = prevWs.Cells(prevWs.Rows.Count, "C").End(xlUp).Row
currLastRow = currWs.Cells(currWs.Rows.Count, "C").End(xlUp).Row- The standard pattern to find the last filled row in a column: start from the bottom row (
Rows.Count) and useEnd(xlUp)to move up to the first non-empty cell. - If the column is completely empty, the result will be the first row (1) or higher cells; therefore, it’s recommended to check that
LastRowhas a reasonable minimum value (e.g., >=2 for the range C2:Clast).
To calculate the total sales in column C, we first find the last row with data using the pattern
Cells(Rows.Count, "C").End(xlUp).Row. This is a common method for dynamic traversal in VBA and is widely used in generating financial and statistical reports.
10) Summing Values with WorksheetFunction.Sum
outputWs.Range("B3").Value = Application.WorksheetFunction.Sum(prevWs.Range("C2:C" & prevLastRow)) ' Previous period sales
outputWs.Range("C3").Value = Application.WorksheetFunction.Sum(currWs.Range("C2:C" & currLastRow)) ' Current period salesApplication.WorksheetFunction.Sum(...)calls Excel’s SUM function in VBA and returns the result.- If the range is invalid or contains cell errors,
WorksheetFunction.Summay throw an error; a safer alternative isApplication.Sum(...), which generally handles errors more gracefully.
We use the
Sumfunction in VBA to calculate sales for each period.Application.WorksheetFunction.Sumis equivalent to Excel’s SUM function; however, for more robustness in report-generating scripts,Application.Sumis recommended.
11) Inserting Absolute and Percentage Change Formulas with Formatting
' Calculate the absolute change in sales
outputWs.Range("D3").Formula = "=C3-B3"

' Set number format
outputWs.Range("B3:D3").NumberFormat = "#,##0_);[Red](#,##0)"

' Calculate the percentage change
outputWs.Range("E3").Formula = "=IF(C3<>0, D3/C3, 0)"
outputWs.Range("E3").NumberFormat = "0.00%"Range.Formulasets a string containing an Excel formula (note that argument separators may be;in local Excel versions; useFormulaLocalif needed).NumberFormatdefines the number format: the above format shows positive numbers with thousand separators and negative numbers in red parentheses.- The percentage is calculated with a conditional formula to prevent division by zero.
We use Excel formulas within VBA (
.Formula) to calculate absolute and percentage changes in sales, and then applyNumberFormatto display numbers and percentages clearly. This method is suitable for professional financial reports in Excel.
Note: If you prefer to perform calculations in VBA and only insert the results, use VBA calculations (.Value = currSum - prevSum) to reduce dependency on formula formatting.
12) Final Formatting and Appearance Alignment
outputWs.Columns("A:E").AutoFit
outputWs.Range("A3:E3").HorizontalAlignment = xlCenter
outputWs.Range("A3:E3").VerticalAlignment = xlCenterAutoFitadjusts column widths to fit the contents.HorizontalAlignmentandVerticalAlignmentcontrol text alignment (centered horizontally and vertically here).
After filling the report, we use
AutoFitand set alignment to make the output readable and print-ready. These final steps ensure your report looks professional and is suitable for publishing or sharing with clients.
13) Saving the Report and Closing Source Files
reportPath = mainPath & "\pop-report.xlsx"
reportWb.SaveAs Filename:=reportPath, FileFormat:=xlOpenXMLWorkbook
reportWb.Close SaveChanges:=True

' Close the source workbooks without saving
prevWs.Parent.Close SaveChanges:=False
currWs.Parent.Close SaveChanges:=FalsexlOpenXMLWorkbookcorresponds to the.xlsxformat (numeric value 51); if the output file contains macros, usexlOpenXMLWorkbookMacroEnabled(.xlsmformat) instead.- Closing source files with
SaveChanges:=Falseprevents any changes from being saved. - If the destination file already exists,
SaveAsmay throw an error or overwrite automatically withDisplayAlerts=False— it’s better to check if the file exists and delete or rename it if needed before saving.
After generating the report, we save it to the specified path using
SaveAs. Make sure to choose the file type (.xlsxor.xlsm) according to your needs, and prevent unintended overwrites by checking for file existence beforehand.
14) Releasing Resources and Final Message
Set prevWs = Nothing
Set currWs = Nothing
Set outputWs = Nothing
Set reportWb = Nothing
Set mainWb = Nothing

MsgBox "A new report has been successfully created at the following path: " & vbNewLine & reportPath, vbInformation, "Process Completed"- Setting objects to
Nothinghelps free memory and prevents leftover Excel processes. - The
MsgBoxinforms the user that the operation was successful and displays the output file path.
Finally, by releasing object variables and displaying a success message, the report generation process is completed. This approach ensures no extra Excel processes remain in the background and keeps the user informed of the result.
Improving the CreateComparisonReport Function with Error Handling and Resource Cleanup
The CreateComparisonReport function provided in the previous code lacked error handling, and resource cleanup was placed at the end of the procedure. While this approach can be effective for small projects with limited scope, it can lead to issues in the user’s system and degrade the user experience in larger projects. It’s better to implement proper error handling and resource cleanup.
Sub CreateComparisonReport(ByVal prevMonth As Byte, ByVal currMonth As Byte)
On Error GoTo errHandler
' Declare all variables
Dim mainWb As Workbook
Dim mainWs As Worksheet
Dim reportWb As Workbook
Dim prevWs As Worksheet
Dim currWs As Worksheet
Dim outputWs As Worksheet
Dim mainPath As String
Dim reportPath As String
Dim prevLastRow As Long
Dim currLastRow As Long
' Turn off screen updating and alerts for performance
Application.ScreenUpdating = False
Application.DisplayAlerts = False
' Set the main workbook and get its path
Set mainWb = ThisWorkbook
Set mainWs = mainWb.Worksheets(1)
mainPath = mainWb.Path
' Create a new workbook for the output report
Set reportWb = Workbooks.Add
Set outputWs = reportWb.Worksheets(1)
outputWs.Name = "Comparison Report"
outputWs.DisplayRightToLeft = True
' Build the file paths for the source monthly reports
Dim prevFilePath As String
Dim currFilePath As String
prevFilePath = mainPath & "\sale-reports\" & prevMonth & ".xlsx"
currFilePath = mainPath & "\sale-reports\" & currMonth & ".xlsx"
' Open the previous month's report file
Set prevWs = Workbooks.Open(prevFilePath, ReadOnly:=True).Worksheets(1)
' Open the current month's report file
Set currWs = Workbooks.Open(currFilePath, ReadOnly:=True).Worksheets(1)
' --- Populate the new report with data and structure ---
' Copy the report template to the report file
mainWs.Range("A3:E5").Copy
outputWs.Range("A1:E2").PasteSpecial xlPasteAll
' Add period labels
outputWs.Range("A3").Value = "Month " & MonthName(currMonth) & " compared to month " & MonthName(prevMonth)
' Copy sales data from source files (assuming payment data is in C column)
prevLastRow = prevWs.Cells(prevWs.Rows.Count, "C").End(xlUp).Row
currLastRow = currWs.Cells(currWs.Rows.Count, "C").End(xlUp).Row
outputWs.Range("B3").Value = Application.WorksheetFunction.Sum(prevWs.Range("C2:C" & prevLastRow)) ' Previous period sales
outputWs.Range("C3").Value = Application.WorksheetFunction.Sum(currWs.Range("C2:C" & currLastRow)) ' Current period sales
' Calculate the absolute change in sales
outputWs.Range("D3").Formula = "=C3-B3"
' Set number format
outputWs.Range("B3:D3").NumberFormat = "#,##0_);[Red](#,##0)"
' Calculate the percentage change
outputWs.Range("E3").Formula = "=IF(C3<>0, D3/C3, 0)"
' Format the percentage cell as percentage
outputWs.Range("E3").NumberFormat = "0.00%"
' Auto-fit columns for better readability
outputWs.Columns("A:E").AutoFit
' Set horizontal and vertical alignment of A3:E3 range
outputWs.Range("A3:E3").HorizontalAlignment = xlCenter
outputWs.Range("A3:E3").VerticalAlignment = xlCenter
' Define the path for the new report file and save it
reportPath = mainPath & "\pop-report.xlsx"
reportWb.SaveAs Filename:=reportPath, FileFormat:=xlOpenXMLWorkbook
reportWb.Close SaveChanges:=True
' Close the source workbooks without saving
prevWs.Parent.Close SaveChanges:=False
currWs.Parent.Close SaveChanges:=False
' Inform the user
MsgBox "New report successfully created at the following path: " & vbNewLine & reportPath, vbInformation, "Process Completed"
errHandler:
If Err.Number <> 0 Then
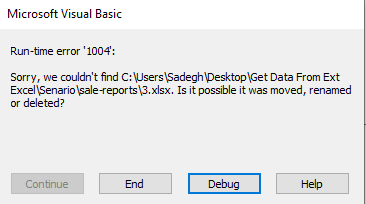
If Err.Number = 1004 Then
MsgBox "Report file not found in the expected path" & vbCrLf & Err.Description, vbCritical, "Error"
End If
If Not reportWb Is Nothing Then
reportWb.Close False
End If
If Not prevWs Is Nothing Then
If Not prevWs.Parent Is Nothing Then
prevWs.Parent.Close SaveChanges:=False
End If
End If
If Not currWs Is Nothing Then
If Not currWs.Parent Is Nothing Then
currWs.Parent.Close SaveChanges:=False
End If
End If
End If
Resume cleanup
cleanup:
' Turn screen updating back on
Application.ScreenUpdating = True
Application.DisplayAlerts = True
' Release object variables
Set prevWs = Nothing
Set currWs = Nothing
Set outputWs = Nothing
Set reportWb = Nothing
Set mainWb = Nothing
If Err.Number <> 0 And Err.Number <> 1004 Then
Err.Raise Err.Number, Err.Source, Err.Description
End If
End SubIn the new code, the On Error GoTo errHandler block and two labels errHandler and cleanup have been added. The following sections explain these additions.
The On Error GoTo errHandler Block
This block tells the compiler that if an error occurs in the CreateComparisonReport procedure, it should jump to the errHandler label. Whenever the compiler encounters an error anywhere in the procedure code, it stops execution and continues from the errHandler label.
errHandler Label
errHandler:
    If Err.Number <> 0 Then
        If Err.Number = 1004 Then
            MsgBox "Report file not found in the expected path" & vbCrLf & Err.Description, vbCritical, "Error"
        End If
        If Not reportWb Is Nothing Then
            reportWb.Close False
        End If
        If Not prevWs Is Nothing Then
            If Not prevWs.Parent Is Nothing Then
                prevWs.Parent.Close SaveChanges:=False
            End If
        End If
        If Not currWs Is Nothing Then
            If Not currWs.Parent Is Nothing Then
                currWs.Parent.Close SaveChanges:=False
            End If
        End If
    End If

    Resume cleanup
1. If Err.Number <> 0 Then
Err.Numberreturns the current error number. This condition checks whether an actual error has occurred or not.- If control reaches
errHandlerbut no error has occurred (for example, due to the lack ofExit Subbefore the label), this condition prevents the error block from executing.
Practical Note: Typically, the standard pattern of Exit Sub before errHandler: is better to prevent the cleanup block from executing unnecessarily; however, this condition provides basic safety.
2. Checking and Displaying Specific Error Messages (If Err.Number = 1004 Then ...)
- The code specifically detects error 1004, which is common in Excel (errors such as accessing non-existent ranges, failed file opening, modifying protected sheets, etc.), and displays a user-friendly message.
Err.Descriptiondisplays the string description of the error to provide users with more information.
Error 1004 is one of Excel’s general errors that typically occurs when opening a non-existent file or accessing an incorrect range.
Technical Note: It’s better to send messages both to the user and to a log (e.g., Debug.Print or a log file) for future debugging purposes.
3. Releasing Resources in Case of Error
If Not reportWb Is Nothing Then
    reportWb.Close False
End If
If Not prevWs Is Nothing Then
    If Not prevWs.Parent Is Nothing Then
        prevWs.Parent.Close SaveChanges:=False
    End If
End If
If Not currWs Is Nothing Then
    If Not currWs.Parent Is Nothing Then
        currWs.Parent.Close SaveChanges:=False
    End If
End If

Resume cleanup- Why is this code necessary? If an error occurs, temporary files might remain open, and if we don’t close them, Excel processes may remain in the background or users may encounter open files.
reportWbis a Workbook that may have been created during execution withWorkbooks.Add. This condition says: if the object exists, close it (andSaveChanges=Falsemeans without saving changes).prevWsandcurrWsare variables of typeWorksheet. To close the entire Workbook containing that sheet, we useprevWs.Parent;.Parentfor a Worksheet returns theWorkbook.- Reasons for using this method: In the code where
Set prevWs = Workbooks.Open(...).Worksheets(1)is used, we have a direct reference to the Worksheet, and to close it we need to access the workbook –prevWs.Parentis the simplest way. - Why two
If Not ... Is Nothingconditions? - The
prevWsvariable might never have been initialized (for example, if an error occurred beforeSet prevWs = ...), in which case accessing.Parentwould cause a new error. - It also accounts for invalid objects or objects released before this block. These two conditions prevent additional errors during cleanup.
Resume cleanupensures that after error handling, the cleanup section always executes.
cleanup Label
cleanup:
    ' Turn screen updating back on
    Application.ScreenUpdating = True
    Application.DisplayAlerts = True

    ' Release object variables
    Set prevWs = Nothing
    Set currWs = Nothing
    Set outputWs = Nothing
    Set reportWb = Nothing
    Set mainWb = Nothing

    If Err.Number <> 0 And Err.Number <> 1004 Then
        Err.Raise Err.Number, Err.Source, Err.Description
    End If
1. Restoring Application Settings
Application.ScreenUpdating = TrueandApplication.DisplayAlerts = Trueare crucial to return Excel to normal state after the macro finishes. If these lines don’t execute, Excel will remain without screen updates or warning displays, which degrades user experience.- Practical Note: If you’ve modified
Application.EnableEventsorApplication.Calculationin the main code, be sure to restore them in cleanup as well.
2. Releasing Objects (Set ... = Nothing)
Set prevWs = Nothingand similar lines only clear the variable reference; this action does not close the workbook itself. Therefore, closing (Close) separately and then releasing references is essential.- Releasing objects helps free COM resources and reference strings, reducing the likelihood of Excel processes remaining in Task Manager.
3. Handling Other Errors
If Err.Number <> 0 And Err.Number <> 1004 Then
    Err.Raise Err.Number, Err.Source, Err.Description
End If- In the label, we only handled error 1004. In this code, if an error has occurred (error number is not zero) and the error number is not 1004, the compiler error message is thrown to the user.
Summary
In this article, we learned step by step with complete details how to access data from another Excel file in VBA. We started from basic topics like simple cell linking and progressed to implementing an advanced, fully practical scenario for creating automated reports.
Key Points
- Choosing the Right Method: Use direct linking for simple tasks and leverage VBA’s power for complex, automated processes.
- Resource Management (Object Management): One of the fundamental pillars of professional VBA programming is properly opening and closing external files and releasing objects with the
Set ... = Nothingcommand to prevent errors and excessive memory consumption. - Error Handling: Using the
On Error GoToblock and related labels makes your script resilient against unexpected conditions (such as file not found) and creates a better user experience. - Performance Optimization: Temporarily disabling
Application.ScreenUpdatingandApplication.DisplayAlertssignificantly increases code execution speed.
Summary of the Implemented Scenario
In the practical scenario of this tutorial, we designed an intelligent system that:
- Uses the
Workbook_SheetChangeevent to detect user selection in real-time. - Separates the main reporting logic from the event by creating a modular function (
CreateComparisonReport), which improves code readability and reusability. - Ensures report consistency by copying the template from the main file.
- Prevents unintended changes to source data by opening source files in
ReadOnlymode. - Makes reports dynamic and reliable by inserting formulas and using Excel’s calculation functions in VBA.
- Finally, delivers a robust, bug-free script through proper error handling and resource cleanup.
By mastering these concepts, you can now not only access data from other files but also, by combining these techniques, implement complex reporting processes, data integration from multiple sources, and powerful automated systems in Excel.
Read More
How to Convert Excel Files to PDF Using VBA?
Developer Tab in Excel | How to Enable the Developer Tab in Excel
VBA Editor | How to Open the Visual Basic Code Editor?